
How to Batch Create a Month of Social Media Content in One Day
If you are creating social media content one post at a time, you already know how draining it is. You wake up, realize you have nothing planned for today, scramble to come up with an idea, write a caption, find or create a graphic, post it, and then do the whole thing again tomorrow. Every single day. Across multiple platforms.It is exhausting, and it is also the slowest possible way to do it.Content batching flips that entire process on its head. Instead of creating one post per day over thirty days, you create all thirty posts in one focused day. You sit down once, do all the thinking, writing, and creating while you are in the zone, and then you schedule everything so it publishes automatically for the rest of the month.The idea sounds ambitious, but it is genuinely doable once you have a system. In this guide, we will walk through the exact step-by-step process for batching a full month of social media content in a single day. And at the end, we will show you how Socialic ‘s Content Creator and Bulk Creator make the scheduling part so fast that it almost feels like cheating. If you have not settled on a scheduling tool yet, our comparison of the 8 best options in 2026 covers what to look for.
Why Content Batching Works Better Than Daily Posting
Before we get into the how, it is worth understanding why batching is so much more effective than the day-by-day approach. It comes down to how your brain actually works.Every time you switch from one type of task to another, your brain needs time to adjust. Psychologists call this “context switching,” and research consistently shows it costs you anywhere from 15 to 25 minutes of productive focus each time it happens. When you create one post per day, you are context-switching constantly. You go from answering emails to brainstorming a caption to editing a photo to writing a LinkedIn post, and your brain never gets to settle into a single mode of thinking.Batching eliminates that problem. When you write ten captions in a row, you stay in “writing mode” the whole time. When you design eight graphics back to back, you stay in “design mode.” Each post takes less time because your brain is already warmed up and focused on that specific type of work.Here is what batching actually gives you in practical terms:More free time during the week. Instead of spending 30 to 45 minutes every day on social media content, you spend one focused day per month and free up the other 29 days for engagement, strategy, or just living your life.
Higher quality content. When you are not rushing to publish something before lunch, you actually have time to think about what you are saying. Batching gives you the space to be thoughtful instead of reactive.
Consistency without willpower. Consistency is the number one growth factor on every social media platform in 2026, but it is also the hardest thing to maintain when you rely on daily motivation. Batching and scheduling remove motivation from the equation entirely. The posts go out whether you feel like it or not.
A clear view of your overall message. When you create a full month of content at once, you can see the big picture. You can spot gaps, avoid repetition, and make sure your content mix actually feels balanced instead of randomly assembled.
What to Prepare Before Your Batch Day
The single biggest reason content batch days fail is lack of preparation. People sit down on their batch day with a blank screen and no plan, then spend three hours just deciding what to post. By the time they start actually creating, they are already tired and frustrated.You can avoid that entirely by spending 30 to 60 minutes the day before getting these things ready:
- Have your content calendar filled in
Your content calendar should already tell you what to post, on which platform, and on what date. If you do not have one yet, check out our content calendar template guide and build one before your batch day. The calendar is the blueprint. Batch day is the construction. You would never show up to a construction site without blueprints.
- Collect your content ideas and references
Throughout the month, save anything that sparks an idea. Screenshots of posts that caught your attention, questions your audience asked in comments or DMs, trending topics in your niche, quotes you want to riff on, customer feedback, behind-the-scenes moments. Dump all of it into a single folder or note. When batch day comes, you will not have to brainstorm from scratch because you already have a library of raw material waiting.
- Decide your tools in advance
Nothing kills momentum on batch day like stopping to figure out which app to use for designing graphics, which font looks good, or where to find stock photos. Decide all of this beforehand. Know which design tool you will use (Canva, Figma, Adobe Express, whatever works for you), which stock photo sources you will pull from, and where you will schedule everything when you are done. The fewer decisions you make on batch day, the faster you move.
- Block the full day on your calendar
This part is not optional. If you try to batch content between meetings and email replies, you will get half as much done in twice the time. Block the day. Turn off notifications. Tell your team you are unavailable. Treat it like a deadline, because it is one.The Full Batch Day Schedule (Hour by Hour)
Here is a realistic hour-by-hour schedule for a single batch day. This assumes you are creating content for two to four platforms and aiming for about 20 to 30 posts for the month. Adjust the timing based on your own speed and volume, but the order of the blocks matters because each one builds on the one before it.Block 1: Brainstorm and Outline (8:00 AM to 9:30 AM)
Open your content calendar and your saved ideas folder. For each slot in the calendar, write a one-line summary of what the post will be about. Do not write full captions yet. Just nail down the core idea for every single post first.For example, if your calendar says “Tuesday, Instagram Carousel, Educational Pillar,” your one-liner might be “5 caption formulas that work for any niche.” That is enough. Move to the next slot.This block should feel fast and loose. You are not writing finished content. You are making decisions about what each post will say so the rest of the day is pure execution.Block 2: Write All Captions and Copy (9:30 AM to 12:00 PM)
Now that you know what every post is about, write all the captions in one session. Open a single document or spreadsheet and write them back to back. Do not switch to designing or filming in the middle. Stay in writing mode for the full block.A few tips for fast caption writing:Start with the hook. Write the first line of every caption before going back to fill in the rest. Hooks are the hardest part, and getting them all done at once prevents you from getting stuck on one post for twenty minutes.
Write for each platform separately. Do not write one generic caption and copy it everywhere. The LinkedIn version should be longer and more conversational. The TikTok caption should be shorter and more direct. The Instagram caption sits somewhere in between. Group your writing by platform so you stay in one voice at a time. If you are not sure a caption fits, Socialic’s free Caption Character Counter checks it against every platform’s limit at once.
Use AI as a brainstorming partner, not a ghostwriter. If you are stuck, use AI tools to generate a rough draft or a list of angle options. But always rewrite it in your own voice before finalizing. Your audience follows you for your perspective, not for generic AI text.
Include your hashtags as you go. Do not leave hashtag research for later. It is a small task, but if you postpone it, you end up doing it thirty separate times instead of once while you are already in the flow.
Block 3: Lunch Break (12:00 PM to 1:00 PM)
Step away from the screen. Seriously. The temptation to keep going is strong when you are in the zone, but skipping this break will cost you more energy in the afternoon than the hour is worth. Eat something real, take a short walk, and come back fresh.Block 4: Create All Visuals and Media (1:00 PM to 4:00 PM)
This is usually the longest block because visual creation takes time, but it goes much faster when you batch it. Group similar formats together:Design all static graphics and carousels first. Set up one template in your design tool, then duplicate and modify it for each post. Keeping a consistent template means you are adjusting text and images, not starting from a blank canvas every time.
Film all videos in one session. If you have multiple talking-head videos or screen recordings to create, do them all in a row. Set up your lighting and camera once and knock them all out. Change your shirt between recordings if you want each one to look like a different day.
Create thumbnails for your video content. YouTube, TikTok, and even LinkedIn video posts benefit from a strong custom thumbnail. Design these alongside your other graphics while you are already in your design tool.
Organize your files by post. Name each file clearly so you know which graphic goes with which post. Something like “Week2-Tues-IG-Carousel-CaptionFormulas.png” saves you a lot of confusion when it is time to schedule.
Block 5: Schedule Everything (4:00 PM to 5:30 PM)
This is the payoff. You have a month of captions written and a folder full of ready-to-go visuals. Now you just need to get them scheduled and published at the right times on the right platforms.If you do this manually by logging into each platform, uploading media, pasting captions, and setting publish times one by one, this step alone can take two to three hours. If you use a scheduling tool like Socialic , it takes a fraction of that. We will walk through exactly how in the next section.
Block 6: Review and Adjust (5:30 PM to 6:00 PM)
Take a final pass through everything you have scheduled. Read through the captions with fresh eyes. Check that the right images are attached to the right posts. Make sure the dates and times make sense and that you are not accidentally publishing three posts on a Monday and nothing on a Thursday. This final review catches the small mistakes that slip through when you are moving fast.Scheduling Your Batched Content with Socialic
You have done the hard creative work. The captions are written, the graphics are designed, and the videos are filmed. Now you need to get everything scheduled to publish at the right time, on the right platform, without manually logging into seven different apps.Socialic gives you two ways to do this, and both are designed specifically for people who batch their content. Depending on how many posts you have and how you prefer to work, you can use either one or combine them.
Option 1: The Content Creator (Create Multiple Posts Visually)
Socialic ‘s Content Creator is designed for building and scheduling posts directly inside the app. What makes it especially useful for batch days is that you do not have to finish and close one post before starting the next. You can create multiple posts in a single session, setting up each one with its own platforms, media, captions, and scheduling details.
This assumes your social accounts are already connected. If they are not, start with how to connect your social media accounts to a scheduler, then come back.Here is how it fits into your batch workflow:Select your platforms for each post. You can choose any combination of Facebook, Instagram, LinkedIn, TikTok, YouTube, Pinterest, and Threads. If the same post is going out on Instagram and LinkedIn, select both and Socialic lets you customize the caption for each platform individually. Your Instagram caption can be casual with hashtags while your LinkedIn version is longer and more professional, all within the same post.
Upload your media files. Drag and drop the images, videos, or graphics you created during your batch day. Socialic handles the format and size requirements for each platform, so you do not need to resize your images separately for Instagram Stories versus LinkedIn feed versus Pinterest pins.
Set custom thumbnails. For video posts going to YouTube, TikTok, or any platform where a thumbnail determines whether someone clicks, you can upload a custom thumbnail directly inside the Content Creator. If you designed thumbnails during your visual creation block, this is where they go.
Fill in platform-specific fields. Every platform has its own requirements beyond just a caption and an image. YouTube needs a video title, description, and tags. Pinterest needs a destination URL and a board name. LinkedIn might need a document upload for a carousel post. Instead of making you remember all of these details, Socialic automatically shows you the fields that are relevant for each platform you selected. You just fill them in and move on.
Set the timezone, date, and time. Pick exactly when the post should go live and in which timezone. If your audience is in London but you are working from Colombo, set the post to publish at 9 AM GMT and Socialic handles the conversion. You never have to do timezone math in your head.
Socialic’s Content Creator: pick your platforms, upload your media, and schedule it all in one step.
For a step-by-step version of this flow, see how to schedule posts to every platform at once, which walks through connecting your accounts and queuing one post across all seven networks.The Content Creator is ideal when you want to review each post visually before scheduling it, when you are working with video content that needs thumbnails and platform-specific settings, or when you want to see exactly how a post will look before it goes out. On a batch day, you can move through 15 to 20 posts in about an hour using this approach.Option 2: The Bulk Creator (Upload an Entire Month at Once)
If you already have all your content planned in a spreadsheet, which you probably do after a proper batch day, the Bulk Creator is the fastest way to go from “planned” to “scheduled.” It is built for exactly this workflow: you take a spreadsheet full of posts and turn them into scheduled content in a single upload.Here is how it works: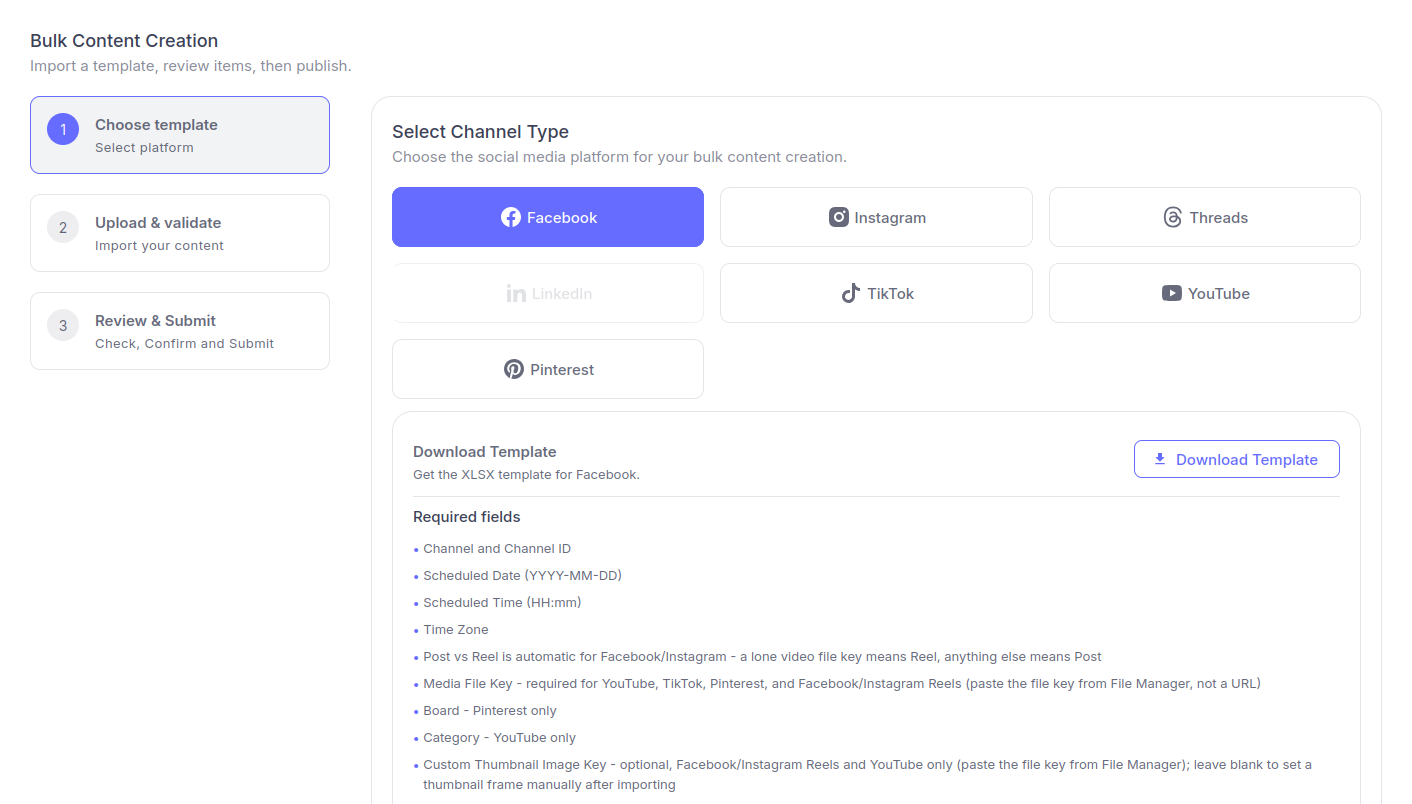
The first screen you see when you open Socialic’s Bulk Creator.
Step 1: Download the Socialic Excel Template
Socialic provides a pre-built Excel sheet with columns for everything a scheduled post needs: the target platform, caption text, media file references, publish date, publish time, timezone, and platform-specific fields like YouTube titles, Pinterest boards, or hashtag sets. The template is already formatted correctly, so you do not have to guess which fields go where or worry about formatting errors.
Step 2: Fill In Your Content
This is the part that feels almost too easy if you have already done your batch day properly. Take the captions you wrote during your writing block, drop them into the caption column. Reference the media files you created during your design block. Set the dates and times from your content calendar. Row by row, your spreadsheet fills up with a full month of ready-to-publish content.If you are managing multiple platforms, each row can target a specific platform with its own caption and settings. A single piece of content that goes out on Instagram, LinkedIn, and Threads becomes three rows, each customized for that platform’s audience and format.
A completed Bulk Creator Excel sheet, ready to upload.
Step 3: Upload and Schedule
Go to Socialic ‘s Bulk Creator, upload the completed Excel file, and Socialic processes every row automatically. It creates a post for each row, attaches the right media, and sets the right publish time in the right timezone. Every processed post lands inside Socialic where you can still review it, edit anything that needs a tweak, and then publish or schedule it. One upload. Thirty, forty, fifty posts. Done.
Once your sheet is processed, every post shows up inside Socialic where you can review, edit, or publish it.
The Bulk Creator is especially powerful for agencies and teams managing multiple accounts. If you handle social media for three clients, you can prepare three separate Excel sheets during your batch day, upload each one to the corresponding Socialic account, and have all three clients fully scheduled in under fifteen minutes total. That is the kind of efficiency that turns a full-time job into a half-day task.
Content Creator vs. Bulk Creator: Which One Should You Use?
Both tools get you to the same result, but they fit different working styles and situations. Here is a quick guide to choosing:Use the Content Creator when you want to preview each post visually before scheduling it, when you are working with complex video posts that need thumbnails and detailed platform settings, when you prefer building posts inside an app rather than in a spreadsheet, or when you are creating a smaller batch of 5 to 15 posts.
Use the Bulk Creator when you have 15 or more posts ready to schedule at once, when you already plan your content in a spreadsheet, when you want the fastest possible path from “content created” to “content scheduled,” or when you are managing multiple client accounts and need to schedule in bulk for each one.
Use both together when you have a mix of simple posts (text, single image) and complex posts (video with custom thumbnails and platform-specific settings). Upload the simple ones in bulk, then use the Content Creator for the ones that need more hands-on setup.
What Types of Content Work Best for Batching?
Not every type of content is equally easy to batch. Some formats lend themselves to bulk creation beautifully, while others need more real-time spontaneity. Here is how to think about it.Great for batching
Educational carousels and infographics. These follow a repeatable format. Once you have a template, you can create ten of them in the time it normally takes to make three.
Quote graphics and tip posts. Minimal design work, mostly text-driven. Perfect for batch creation.
Talking-head videos and screen recordings. Film them all in one session. Same setup, same lighting, just different topics. Change your shirt between takes if you want each video to look like a different day.
Blog post repurposing. If you have existing blog posts, you can pull key points from each one and turn them into social media posts in bulk. One blog post can become an Instagram carousel, a LinkedIn text post, a TikTok script, and a Pinterest pin.
Product showcases and testimonials. If you have a backlog of customer reviews or product photos, turning them into social posts is fast and formulaic.
Better left for real-time
Trending audio or meme content. These depend on what is trending at the moment, and trends move too fast to plan a month ahead.
Live reactions or commentary. Industry news, current events, or responses to viral moments need to be timely.
Community engagement posts. Polls, questions, and interactive content often work better when they feel spontaneous and connected to what is happening now.
How to Turn 10 Ideas into 30 Posts Through Repurposing
One of the biggest misconceptions about batching a month of content is that you need thirty completely unique ideas. You do not. You need about ten solid ideas and a system for repurposing each one across different formats and platforms. For the full platform-by-platform breakdown, see our guide on how to repurpose one piece of content across 6 platforms.Here is how a single content idea can become multiple posts:Original idea: “5 caption formulas that work for any niche.”
Instagram carousel: One slide per formula with an example for each.
TikTok video: Quick 60-second walkthrough of all five formulas with screen text overlays.
LinkedIn text post: A longer breakdown of your favorite one formula and why it works, with a personal story about how you use it.
Pinterest pin: An infographic-style graphic listing all five formulas, optimized with keywords like “Instagram caption formulas 2026.”
Threads post: A quick, casual version like “The caption formula I use on 80% of my posts: [formula]. What is yours?”
When you are scheduling these repurposed posts in Socialic , the per-platform caption fields make this workflow seamless. You start with the same core idea but tailor the tone, length, and format for each channel without switching between different tools.
Common Batching Mistakes to Avoid
Trying to batch without a content calendar
Sitting down to create thirty posts without knowing what they should be about is not batching. It is just spending an entire day staring at a blank screen. Always start with a filled-in content calendar. The calendar tells you what to create. Batch day is when you create it.Mixing task types throughout the day
Writing a caption, then designing a graphic, then writing another caption, then filming a video is the opposite of batching. It might feel productive because you are finishing individual posts, but you are paying the context-switching cost every time you change modes. Group all writing together, then all design, then all video. Stay in one mode until it is done.Being too rigid with your batch
Batching a month of content does not mean that every post is locked in forever. Things change. A trending topic might pop up. You might get a great customer testimonial that deserves a post. Leave some flexibility in your calendar (those 20-30 percent open slots we mentioned earlier), and be willing to swap out a scheduled post for something more timely when it makes sense.Skipping the review step
After creating and scheduling thirty posts in one day, it is tempting to close the laptop and call it done. But mistakes happen, especially when you are moving fast. A quick 30-minute review pass where you read through every scheduled post, check the attached images, and verify the dates and times will catch typos, wrong images, and scheduling conflicts before they go live. It is much easier to fix a mistake before it publishes than after.Forgetting to engage after publishing
Batching and scheduling your posts does not mean you can ignore your accounts for the rest of the month. The posts go out automatically, but the comments, DMs, and discussions they generate still need your attention. Set aside 15 to 20 minutes per day for engagement, even on days when you are not creating content. This is the part that builds relationships and community. The batched content opens the door, but engagement is what keeps people coming back.Final Thought
Content batching is not about working harder on one day so you can slack off for the rest of the month. It is about working smarter so that the creative work happens when you are focused and energized, and the publishing happens on autopilot regardless of how busy or tired or uninspired you feel on any given Tuesday.The process is straightforward. Prepare your content calendar the day before. Spend one focused day brainstorming, writing, and creating. Schedule everything using Socialic ‘s Content Creator for posts that need visual attention, or the Bulk Creator when you want to upload an entire month in one shot. Then spend the rest of your month engaging with your audience, analyzing what works, and actually running your business instead of scrambling for content ideas every morning.
One day of focused work. A full month of consistent content. That is the trade-off, and it is a good one.Try Socialic free and schedule your first batch of content today.
Keep Reading
Batch day only works as well as the plan behind it. If you have not built one yet, start with the ultimate social media content calendar template for 2026 to map out your content pillars, platforms, and posting frequency before your next batch session.
Not sure what your content pillars should be yet? Read how to never run out of content ideas to define yours before your next batch day, so you already know exactly what to create.