How to Connect Your Social Media Accounts to a Scheduler (Without Losing a Page)
To connect your social media accounts to a scheduler, you open the tool’s Sync (or Accounts) page, click Connect next to each platform, authorize the tool on that platform’s own login screen, and then choose which specific Pages or profiles to keep synced. In Socialic this covers Facebook, Instagram, Threads, LinkedIn, Pinterest, TikTok, and YouTube, and the whole thing takes a couple of minutes per account.The one part that trips people up is Meta. When you authorize Facebook or Instagram, Facebook shows a list of your Pages and asks which ones to grant access to. That screen is not additive. It replaces whatever you granted before. Untick a Page that was already connected and you lose that connection. This guide walks through the full flow and calls out exactly where that risk is.By the end you will have every account you need connected, know the difference between deactivating and deleting a channel, and understand what to do when a channel shows “Needs Reauth” months from now.What “Connecting” Actually Does
Connecting an account does not give the scheduler your password. It uses OAuth, the same “Sign in with…” mechanism you have used on dozens of sites. You log in on the platform’s own page, the platform asks whether you want to let the app do specific things (read your Pages, publish posts, read comments), and if you agree it hands the app a token. The app uses that token to act on your behalf until it expires or you revoke it.Two practical consequences of how OAuth works:You must be logged into the right account in that browser first. The authorization window inherits whatever session your browser already has. If you are logged into a personal account when you meant to use a business one, you will connect the wrong thing.
Tokens expire. Every platform ages out access tokens on its own schedule, and a password change or permission change can invalidate one early. When that happens the channel keeps existing in Socialic but stops publishing until you re-authorize it.
Before You Start
A Socialic account. The free plan lets you connect accounts and schedule a set number of posts per month, which is enough to set everything up and test it.
The right permissions on each platform. You need to be an admin of any Facebook Page you want to connect, have posting rights on the LinkedIn page, and be able to log in to the YouTube, TikTok, Threads, and Pinterest accounts.
Instagram set to Business or Creator. Instagram publishing through any scheduler only works with a Business or Creator account linked to a Facebook Page. If yours is a personal account, switch it in the Instagram app first.
The correct account active in your browser. Before you start, open a tab and confirm you are logged into the exact Facebook, Google, LinkedIn, etc. account you want Socialic to use.
Step 1: Open the Sync Page
In Socialic, click Sync in the left menu. The Sync page has its own sub-menu listing every platform: Facebook, Instagram, Threads, LinkedIn, Pinterest, TikTok, and YouTube. Each one opens a panel showing the accounts you already have synced for that platform, plus a Connect button in the top right to add a new one.If a platform in that sub-menu has a small warning icon next to it, one or more of its channels needs re-authorization. We cover that near the end of this guide.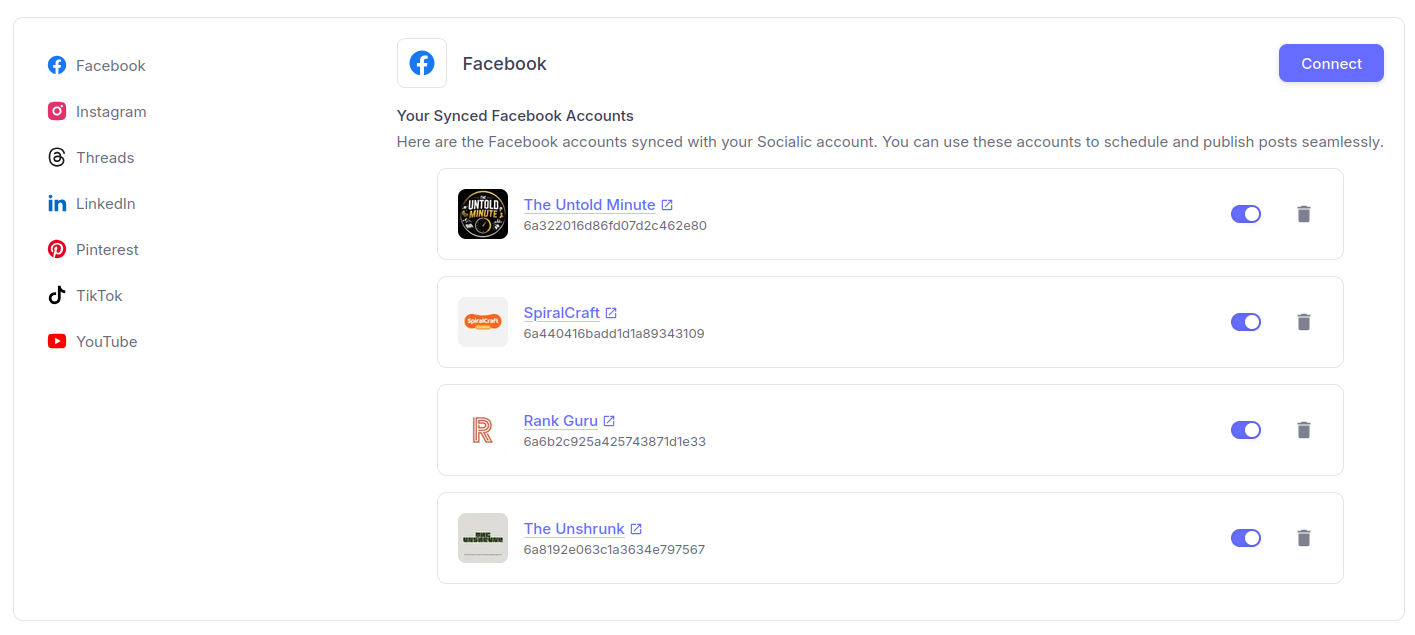
The Sync page. Each platform has its own tab; connected accounts appear in a list with a toggle and a delete button, and Connect starts a new authorization.
Step 2: Click Connect and Read the “Before You Continue” Dialog
Click Connect on the platform you want. Socialic first checks that your plan still has room for another connected account. If it does, a Before You Continue dialog appears. It does two things:Tells you where you are about to go. You will be redirected to the platform’s own site to authorize Socialic. This is your cue to double-check you are signed in to the correct account there.
Warns you about Page selection. For Facebook and Instagram it makes you tick a box confirming you understand you must select every Page in the authorization window. For LinkedIn it explains that you will pick which pages or profiles to connect after authorizing.
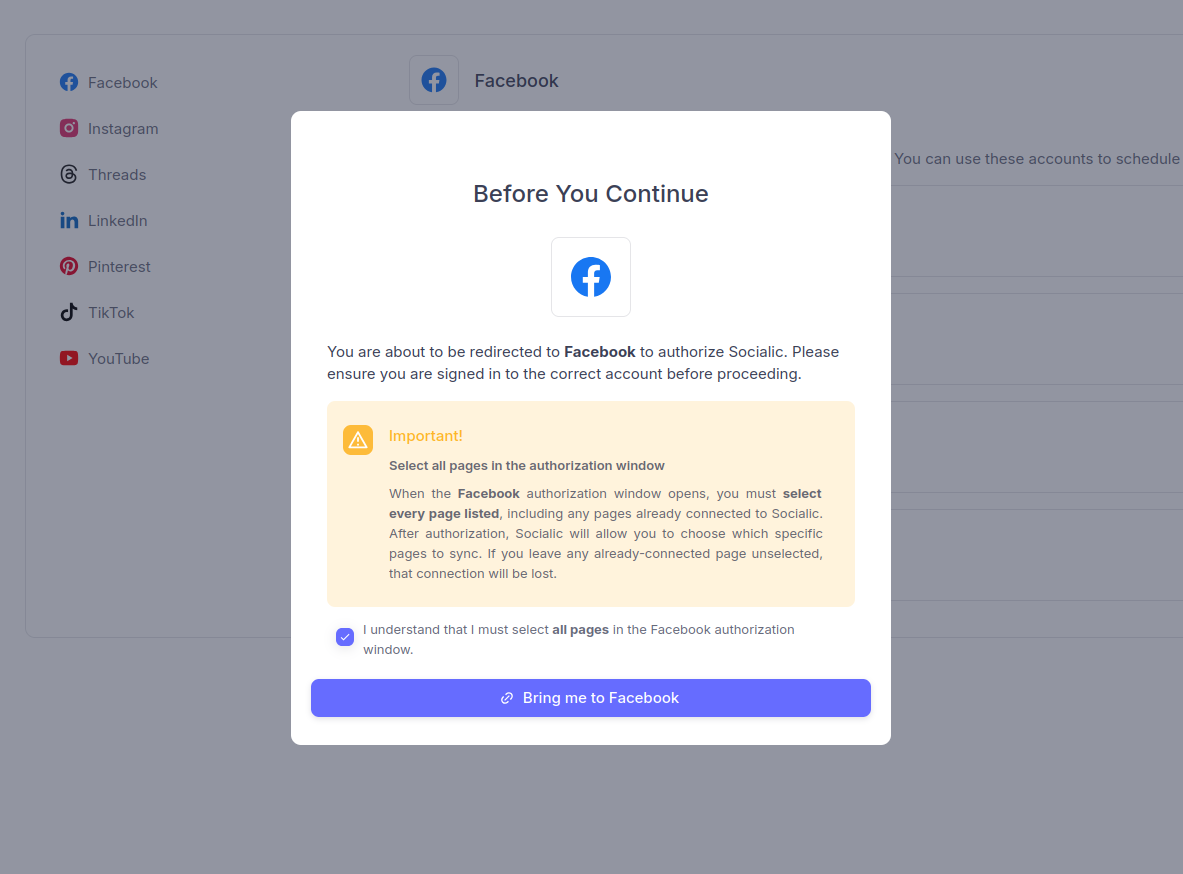
The “Before You Continue” dialog. You have to tick the “I understand I must select all pages” box before the “Bring me to Facebook” button will take you across.
Step 3: Authorize on the Platform
You are now on the platform’s own authorization screen, not on Socialic. What you see next depends on the platform.Facebook, Instagram, and Threads — select every Page
Meta shows a screen titled “Choose the Pages you want Socialic to access” with a checkbox next to each Page. Use Select all, or tick every Page by hand. Every single one, including Pages you connected to Socialic weeks or months ago. Meta treats this screen as the full, final list of what the app may access. It does not merge with your previous choice. If a Page that was already connected is left unticked here, its connection is replaced and lost, and it shows up afterwards as a missing channel you have to re-authorize.The screen also offers “Opt in to all current and future Pages” or “current Pages only”. Either is fine; “current Pages only” with everything ticked is enough. What matters is that no Page is left unchecked.This is the single most common way people accidentally break a working connection. When in doubt, select everything. You get to narrow it down on the Socialic side in the next step.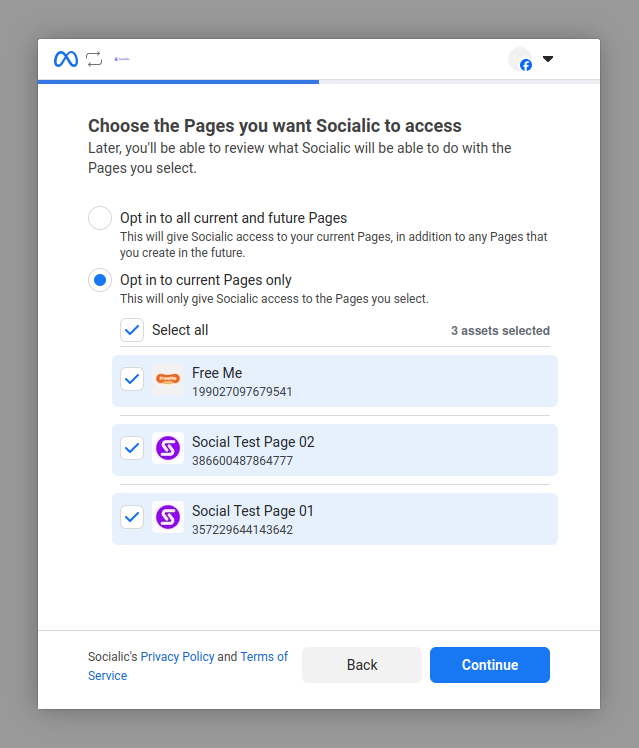
This is Facebook’s own screen, not Socialic’s. Check “Select all” so every Page is ticked — leaving one unchecked drops that Page’s connection.
LinkedIn — authorize, then pick pages
LinkedIn’s screen is a straightforward “allow Socialic to…” prompt. After you approve it, you come back to Socialic and choose which LinkedIn item to connect: your personal profile, one or more company or showcase pages you manage, or a combination.Pinterest, TikTok, and YouTube — one approval
These connect directly. You approve the permissions on the platform and Socialic syncs the account. For YouTube the Google screen may list several permission scopes; all of them are needed to upload and manage videos. If TikTok shows Coming Soon instead of Connect, new TikTok connections are paused for maintenance. Check back shortly.Step 4: Choose Which Accounts to Keep Synced
Back on Socialic, a selection dialog appears for the platform you just authorized:Select Facebook Pages / Select Instagram Accounts / Select Threads Accounts. Every Page or account you granted in the authorization window is listed. Tick the ones you actually want to manage in Socialic. The rest stay authorized at the Meta level but are not added as channels.
Select Social Accounts (LinkedIn). Choose your profile and any company pages to connect.
Step 5: Confirm the Channel Is Ready
A connected channel shows up on its platform tab with the account name, avatar, an on/off toggle, and a delete button. Two quick checks that it is genuinely ready:The toggle is on. An on channel is available for scheduling. A channel with no “Needs Reauth” badge and its toggle on is good to go.
It appears in the Content Creator. Open the Content Creator and check the new channel shows up in the “Select Channels” step. If it does, publishing will work.
With at least one channel connected you can move straight into scheduling. Our guide on how to schedule posts to every platform at once picks up exactly where this one ends.
Deactivating vs. Deleting a Channel
Each connected channel has two controls, and they are not the same thing.The toggle: deactivate
Switching a channel off deactivates it. It stays connected and keeps its history, but it is hidden from the Content Creator so you cannot accidentally schedule to it. Use this when you are pausing a client or a seasonal account and expect to bring it back. Switching it back on restores it immediately, no re-authorization needed.The trash icon: delete
Deleting removes the channel and all its associated data and settings from Socialic. It cannot be undone, and bringing the account back means connecting it again from scratch. Do this when you have genuinely stopped managing an account, or to free up a connection slot on your plan.When a Channel Says “Needs Reauth”
Sooner or later a channel will show a Needs Reauth badge, and the platform’s tab in the Sync sub-menu will show a warning icon. This is normal. It means the access token expired or was invalidated, commonly after:- a password change on the social account
- changing the app’s permissions in the platform’s settings
- the platform’s own token lifetime running out
- removing and re-adding an admin on a Facebook Page
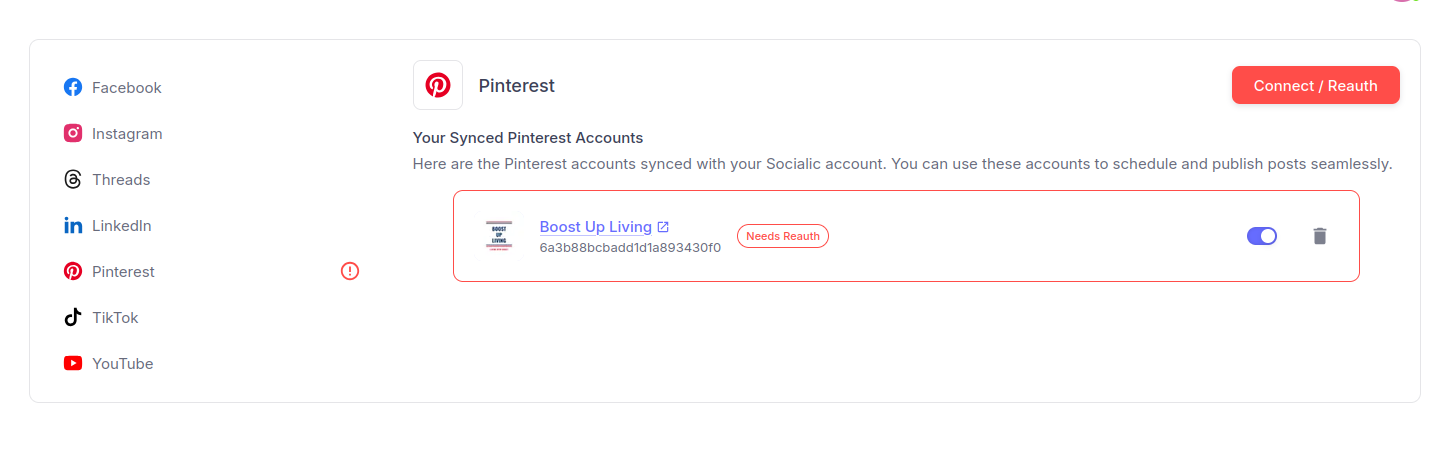
A channel that needs re-authorization: a warning icon on the platform in the sub-menu, a “Needs Reauth” badge on the account, and a red “Connect / Reauth” button.
Plan Limits on Connected Accounts
There are two kinds of limit on how many accounts you can connect:A total limit on connected social accounts across all platforms.
A per-platform limit on some plans, for example a cap on how many TikTok or Instagram accounts you can sync.
Platform-Specific Notes
Facebook: Pages only
Socialic connects Facebook Pages, not personal profiles, because Facebook’s publishing API does not support personal profiles. If you only have a personal profile, create a Page first.Instagram: Business or Creator, linked to a Page
Instagram must be a Business or Creator account connected to a Facebook Page. This is an Instagram platform requirement for any third-party publishing tool, not a Socialic restriction. Convert it in the Instagram app under account settings, link it to your Page, then connect.YouTube: keep some manual activity
After you connect YouTube, Socialic reminds you that YouTube’s systems watch for channels that look fully automated. Sign in and manually publish, like, comment on, or share something on your channel at least once a week so the account keeps looking authentic.TikTok: private accounts
A private TikTok account can be connected, but its posting options are more limited. Socialic marks private TikTok channels so you know why some settings are unavailable when you compose a post.Common Mistakes to Avoid
Unticking a Page you already connected
Covered above, but it is worth repeating because it is the number one issue. On Meta’s authorization screen, select every Page, every time, including on a re-auth.Being logged into the wrong account
The authorization window uses whatever session your browser has. If you manage a client’s Facebook from a separate login, switch to it before clicking Connect, or use a separate browser profile per client.Expecting a personal Instagram to work
If Socialic cannot see your Instagram account, it is almost always because the account is still personal or is not linked to a Facebook Page. Fix both and try again.Closing the tab mid-authorization
If you close the platform’s window before it redirects back, the connection does not complete and nothing is saved. Start again from the Connect button.Ignoring a “Needs Reauth” badge
A channel that needs reauth is not publishing. If posts for one platform silently stopped going out, check the Sync page first.Frequently Asked Questions
Why does Meta ask me to select Pages every time I connect or re-authorize?
Facebook’s authorization screen treats each grant as the complete set of Pages you want the app to access. It does not remember your previous choice. If you leave a Page unticked, even one that was already connected, that grant is replaced and the connection is dropped. Always tick every Page in the list.Can I connect a personal Facebook profile?
No. Socialic connects Facebook Pages, not personal profiles, because Facebook’s publishing API only supports Pages. If you do not have a Page yet, create one from your Facebook account first, then connect it on the Sync page.Why can’t Socialic find my Instagram account?
Instagram publishing through any scheduler requires an Instagram Business or Creator account that is linked to a Facebook Page. Switch your Instagram account to Business or Creator in the Instagram app, link it to your Page, then connect it from the Sync page.What does the “Needs Reauth” badge mean?
The platform expired the access token Socialic was using, usually after a password change, a permissions change, or a set time limit. Your scheduled posts pause for that channel until you click Connect / Reauth on the Sync page and run through authorization again.How many accounts can I connect?
It depends on your plan. There is a total limit on connected social accounts and, on some plans, a per-platform limit. If you hit one, Socialic tells you which plan raises it. Deleting a channel frees a slot; deactivating one does not.Final Thought
Connecting accounts is a five-minute job that people lose an afternoon to, almost always for the same reason: unticking a Page on Meta’s authorization screen. Get that one habit right, select everything every time, and the rest of the flow is just clicking Connect and approving a prompt.Open the Sync page, connect each platform, choose which Pages and profiles to keep, confirm the toggle is on, and check the channel appears in the Content Creator. When a “Needs Reauth” badge shows up later, treat it the same way, and remember the Page rule applies again.Connect once, carefully. Then never think about it again until a badge tells you to.Try Socialic free
and connect your first account today.
Keep Reading
With your accounts connected, the next step is publishing. Read how to schedule posts to every platform at once to queue one post across all seven networks in a single session — then manage every reply from one inbox once those posts are live.
Planning a bigger push? Pair it with how to batch create a month of social media content in one day and the ultimate social media content calendar template for 2026.